How to use SQL for geographic place recommendations | Census
Parker RogersOctober 08, 2021
Parker is a data community advocate at Census with a background in data analytics. He's interested in finding the best and most efficient ways to make use of data, and help other data folks in the community grow their careers. Salt Lake City, Utah, United States
In this article, you'll learn how to use SQL to send highly personalized email drip campaigns using geographic place recommendations and the haversine function. Specifically, we'll break down:
What is the haversine formula?
How to find users who Yelp within five miles of a business
How to find users who have Yelped more than five times about businesses like our example
How to find users who leave at least a four-star average
How to operationalize our resulting data at scale
Let’s say you have some lead data containing geographic coordinates. What can you do with it? How can it help your business? With a little SQL skill and the implementation of the haversine formula, you can query through your data for the following digital marketing use cases:
Send highly personalized email drip campaigns based on user location
Improve product analytics tools by adding custom location data to each user
Create geo-targeted digital ads that are more likely to convert
We'll write a query to help us with the first geotargeting use case: Send highly personalized email drip campaigns based on user location.
This cheat sheet will help you understand how to use SQL and the haversine formula for geographic place recommendations (AKA geotargeting). At the end, we'll also help you operationalize this data by syncing it to frontline tools like your CRM, product analytics platform, and more.
Short on time (or just prefer to learn via video vs write-ups)? Check out the TL;DR episode for this article.
Now let’s get started!
What is the haversine formula?
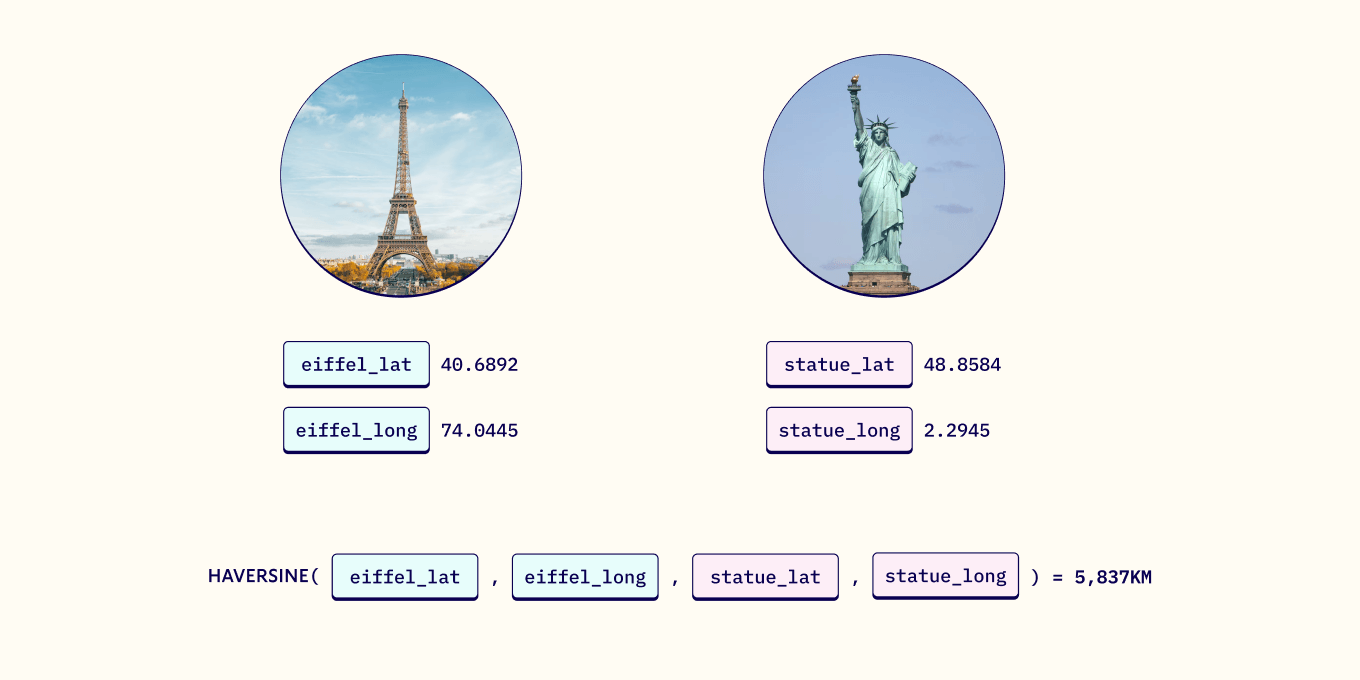
The haversine formula calculates the kilometric distance between two locations using latitudinal and longitudinal coordinates. For example, it can help us calculate the distance between two major landmarks (like the Eiffel Tower and the Statue of Liberty, as seen in the example below).
According to the haversine formula, the two landmarks are 5,837 KM apart. Simple enough, right?
Now let’s use our example Yelp datasets and the Haversine Formula to upgrade our outreach campaigns and send granular, highly personalized email drip campaigns based on user location/IP address to improve conversions. Let's take a look at how geotargeting works with SQL.
How to build geographic place recommendations with SQL
If you're a SQL expert, or if you simply just want to see how the haversine formula works with our example Yelp dataset, feel free to skip ahead to the haversine formula query (no judgment).
If you're in it for the full SQL learning experience, let's dive in.
Understand the database table’s meanings & relationships
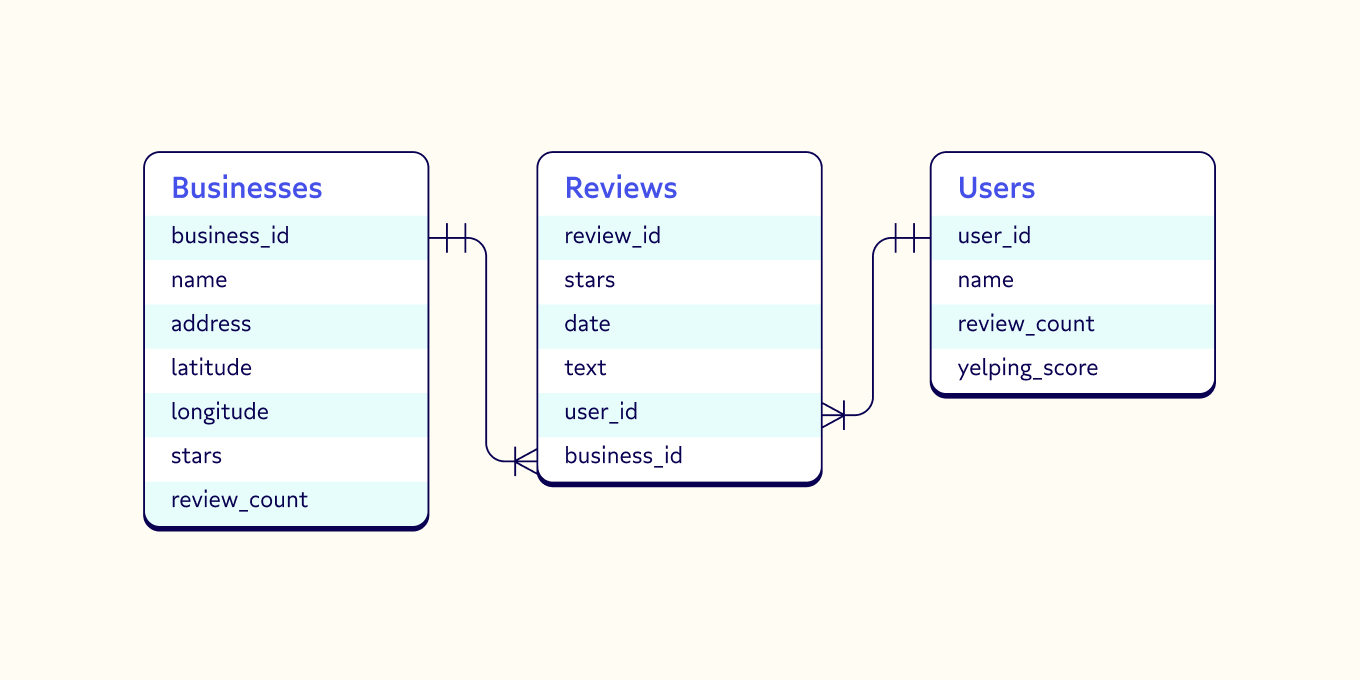
Before we query anything, we need to understand our data. Here’s a summary of 3 of the Yelp tables:
All three tables have unique identifiers which allow us to query between them as needed. Also, the business table has geographic fields (latitude and longitude) which we will use in the haversine formula.
Conceptualize the data you’ll need
We want to write a query that will allow us to send highly personalized email drip campaigns with location targeting. First, we'll need to identify the information we'll need about our target audience. We know that we want reviews from folks who live close to our business (not just tourists), actively use Yelp, and generally like restaurants like our own. So, we can break down the characteristics of these users as follows:
Find users who Yelp within five miles of our business using the haversine formula
Find users who have Yelped more than five times about businesses like ours
Find users who give at least four-star reviews on average
Now it's time to get our hands dirty with some SQL.
Step #1: Find users who Yelp within five miles of our business
First, we need to create a subquery for our business, which we'll refer to as my_bus to reference it when we use the haversine formula. To do this, we'll use the following code:
WITH my_bus as(SELECT
Business_id,
name,
state,
city,
latitude,
longitude
FROM
content.yelp.businesses
WHERE
business_id ='YJ8ljUhLsz6CtT_2ORNFmg')
Note: If you've been to Las Vegas, this information probably looks pretty familiar. :wink: We're using the famous Gordan Ramsay's Burger in Las Vegas, Nevada.
The SQL above generates the following table, including the specific location of our business.
BUSINESS_ID
NAME
STATE
CITY
LONGITUDE
LATITUDE
YJ8ljUhLsz6CtT_2ORNFmg
Gordon Ramsay Pub & Grill
NV
Las Vegas
-115.175757
36.117417
Next, we will use the JOIN clause to connect the three Yelp tables using the unique identifiers of each table.
SELECT*FROM
content.yelp.users AS user1
JOIN
content.yelp.reviews AS rev1
ON user1.user_id = rev1.user_id
JOIN
content.yelp.businesses AS bus1
ON rev1.business_id = bus1.business_id
ORDERBY
user1.user_id DESCLIMIT1000
The output of this query shows unique reviews (rev1) as well as the corresponding user (user1) and the corresponding business (bus1).
We'll then add these ID fields to the SELECT statement:
Here’s what the query output looks like with the ID fields in the SELECT statement. Notice that the respective user and business IDs match for each row.
Next, we join our temporary table (my_bus) using the haversine formula. This can look tricky at first glance, so let’s break it up into two parts:
Part one: Create JOIN clause containing the haversine formula:
Pass the latitudinal and longitudinal coordinates of the business (bus1)
Pass the latitudinal and longitudinal coordinates of our business (my_bus)
Convert the haversine formula calculation from kilometers to miles.
This join clause goes through each individual row of data and calculates the geographic distance between the business (bus1) and our business (my_bus). The multiplication at the end of the JOIN converts the haversine value from kilometers to miles.
You can now view the results of the haversine formula by adding it as a field in the SELECT statement.
Now we can put it all together. So far, our full SQL query looks like this:
WITH my_bus as(SELECT
Business_id,
name,
state,
city,
latitude,
longitude
FROM
content.yelp.businesses
WHERE
business_id ='YJ8ljUhLsz6CtT_2ORNFmg')SELECT(haversine(bus1.latitude, bus1.longitude, my_bus.latitude, my_bus.longitude)*0.621371),*FROM
content.yelp.users AS user1
JOIN
content.yelp.reviews AS rev1
ON user1.user_id = rev1.user_id
JOIN
content.yelp.businesses AS bus1
ON rev1.business_id = bus1.business_id
JOIN
my_bus
ON(haversine(bus1.latitude, bus1.longitude, my_bus.latitude, my_bus.longitude)*0.621371)<5AND bus1.business_id <> my_bus.business_id
ORDERBY user1.user_id DESCLIMIT1000
Congrats! You know how to use the haversine formula to use geotargeting! :tada:. We've officially used it to complete part one of our use case to send highly personalized drip campaigns to our users based on their foot traffic (location).
✅ Find users who Yelp within five miles of our business
✅ Find users who have Yelped more than five times about businesses like ours
✅ Find users who give at least four-star reviews on average
Next, we'll blitz through steps two and three of our use.
Step #2 & #3: Find users who have Yelped more than five times about businesses like ours w/ at least a four-star average
Next, we'll find users who have a history of visiting local businesses like ours to further tailor our marketing efforts and marketing campaigns. For the sake of code efficiency, we'll also find folks who leave an average of four-star reviews in the same sweep.
To start, we'll use a WHERE clause so our query only includes businesses in the same category as ours: sitdown restaurants.
Here's the code:
WHERE
lower(bus1.categories)LIKEANY('%restaurant%','%food%')ANDNOT lower(bus1.categories)LIKEANY('%convenience%','%shopping%','%grocery%','%fast%')
We'll then use a GROUP BY statement so our query shows unique users rather than unique reviews.
GROUPBY
user1.user_id
Note: Don’t run your SQL code yet. GROUP BY statements tend to break queries. First, change the fields in your SELECT statement to the following:
SELECT
user1.user_id AS user_id,AVG(haversine(bus1.latitude, bus1.longitude, my_bus.latitude, my_bus.longitude)*.621371)AS avg_distance_from_my_bus,COUNT(rev1.review_id)AS total_reviews_near_my_restaurant,AVG(rev1.stars)AS avg_stars_in_restaurant_category
These new fields will provide the following information:
user_id: the unique id of a user
avg_distance_from_my_bus: The average distances between my business and the Yelp businesses that the user reviewed
total_reviews_near_my_restaurant: The total number of Yelp reviews a user has made about businesses similar to ours.
avg_stars_in_restaurant_category: The average number of stars of a user’s reviews.
Finally, we'll run a HAVING clause. This clause will check the box on both steps #2 and step #3 to narrow down folks who:
Have reviewed more than five businesses near our business
Have an average star rating of at least four
Here's the code:
HAVING
total_reviews_near_my_restaurant >5AND avg_stars_in_restaurant_category >=4
Phew! That was a lot of SQL. You've completed the three tasks necessary to send highly personalized email drip campaigns based on user location:
✅ Find users who yelp within 5 miles of our business
✅ Find users who have yelped 5+ times about businesses like ours
✅ Find users who give at least four-star reviews on average
Here’s what our full query looks like:
WITH my_bus as(SELECT
business_id,
name,
state,
city,
latitude,
longitude
FROM
content.yelp.businesses
WHERE
business_id ='YJ8ljUhLsz6CtT_2ORNFmg')SELECT
user1.user_id AS user_id,AVG( haversine( bus1.latitude, bus1.longitude, my_bus.latitude, my_bus.longitude )*.621371)AS avg_distance_from_my_restaurant,COUNT(rev1.review_id)AS total_reviews_near_my_restaurant,AVG(rev1.stars)AS avg_stars_in_restaurant_category
FROM
content.yelp.users AS user1
JOIN
content.yelp.reviews AS rev1
ON user1.user_id = rev1.user_id
JOIN
content.yelp.businesses AS bus1
ON rev1.business_id = bus1.business_id
JOIN
my_bus
ON( haversine( bus1.latitude, bus1.longitude, my_bus.latitude, my_bus.longitude )*0.621371)<5AND bus1.business_id <> my_bus.business_id
WHERE
lower(bus1.categories)LIKEANY('%restaurant%','%food%')ANDNOT lower(bus1.categories)LIKEANY('%convenience%','%shopping%','%grocery%','%fast%')GROUPBY
user1.user_id
HAVING
total_reviews_near_my_restaurant >5AND avg_stars_in_restaurant_category >=4ORDERBY
user1.user_id DESCLIMIT1000
So you’ve successfully completed the query. Now what? Well, you could export the data as a CSV and then import it into your CRM. Or use your command line. (If your eyes are glazing over, don't worry. There's a better way).
The better way to operationalize your user data: Reverse ETL
You just did a lot of SQL work to get a usable, granular set of customer data, don't waste all that work now. Instead, use reverse ETL to easily move your data from your warehouse out to your frontline tools to quickly, reliably fuel your email campaigns (and every other outreach effort you have on your plate).
At Census, we’ve created a tool that removes the headaches of syncing your data warehouse to your CRM (and beyond). And the best part is you can try it for free.