How to Integrate Data from Snowflake to Segment (4 Methods) | Census
Parker RogersJanuary 12, 2022
Parker is a data community advocate at Census with a background in data analytics. He's interested in finding the best and most efficient ways to make use of data, and help other data folks in the community grow their careers. Salt Lake City, Utah, United States
In this article, you'll find four separate solutions to sync data from Snowflake to Segment:
As always, if you're looking for more resources to further your data skills (or just make your current data day-to-day easier) check out our other how-to articles here.
So you want to sync data from your Snowflake data warehouse to Segment. What a spectacular idea! Once accomplished, you can further enrich your digital advertising, email marketing, webhooks, user personas, and more. This article will show you four solutions to sync data from Snowflake to Segment. Step-by-step instructions are included for each solution so you can pick the one that suits your expertise and needs, whether you're looking to set up a one-time sync or instrument a more robust long-term solution.
Solution #1: Cloud app source
The first way to sync data from Snowflake to Segment is by using Segment's cloud-app source. Segment’s cloud-app source lets you retrieve data from external sources (ex. Snowflake) so that you can use them in Segment. When you cannot directly pull data into Segment, you can potentially use one of the sources as a staging location and then load it into Segment.
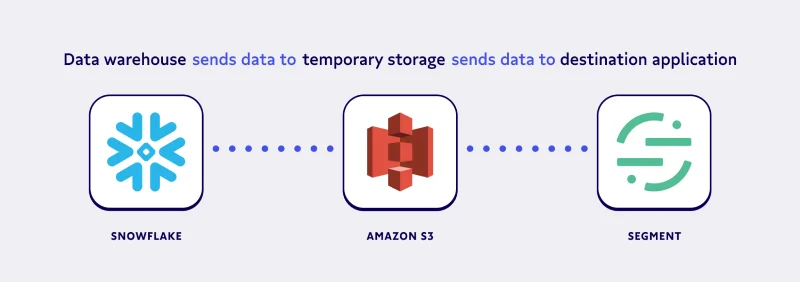
Currently, Segment cloud-app source does not directly support Snowflake. However, you can explore supported cloud-app sources to see if there is already a service you are using or planning to use. Among the sources, AWS S3 can be a good solution to close the gap. For this tutorial, we'll pull data from Snowflake into an AWS S3 bucket, and then sync the AWS S3 data to Segment.
Before we dive into using AWS S3, we need to understand the concepts of Segment’s two cloud-app sources: events and objects.
Understand event and object cloud-app sources
Event cloud-app sources refer to data sources that generate event data once. This could include sources like ActiveCampaign, Amazon S3, Facebook Leads API, etc.
In contrast, object cloud-app sources refer to data sources that usually contain information about a person or group that can be updated later. Popular object cloud-app sources include Facebook Ads, Google Ads, HubSpot, Salesforce, Zendesk, Stripe, etc.
Now that we understand the distinction between object and event cloud-app sources, we can dive into using AWS S3.
Use event cloud-app source for Amazon S3
AWS S3 is an extremely versatile service that can store all types of digital data. One of the features of S3 is that you can invoke an event whenever you put an object into an S3 bucket. To add objects into the bucket, we’ll develop an ETL pipeline between Snowflake and S3 bucket and schedule the operation to ensure continuity.
Unloading data into your S3 bucket
Snowflake provides a convenient way to directly unload data into an S3 bucket. You need to configure your AWS credential in Snowflake so Snowflake can access your S3 bucket. You can do this either by using Snowflake’s storage integration or by providing AWS_KEY_ID and AWS_SECRET_KEY in a COPY command. The COPY command follows the syntax below:
In the main COPY statement, note that you can use SQL query (<query>) to select data. With this, we can schedule a COPY command that selects the data that was created within a certain time frame.
For destination options, to export data into an S3 bucket, we need to use externalLocation to export data into an S3 bucket using the following syntax structure:
In the externalLocation statement, you can provide your storage integration name or a pair of AWS Key ID and Secret Key explicitly.
In the main COPY statement, note that you can use SQL query to select data. With this, we can schedule a COPY command that selects the data that was created between a certain time frame.
Before we run this command, we need to use the externalLocation statement which has the following syntax structure.
In the externalLocation statement, provide your storage_integration_name or a pair of aws_key_id and aws_secret_key explicitly.
Once you’ve executed this statement properly, your Snowflake data will be successfully exported to your Amazon S3 bucket. Then you'll use the Lambda function to upload the Amazon S3 data to Segment.
Next, we'll look at a solution that doesn’t use temporary data storage like Amazon S3.
Solution #2: HTTP tracking API source
Segment has HTTP Tracking APIs that allow you to track data from any website or application. When you send a request to the tracking API, it goes through Segment’s servers and they route the data to the destination you define. You can send requests using Segment’s server-side sources.
How to use Segment’s server-side source
In addition to the cloud app source, we can also use server-side sources to send data into Segment directly from our servers. Since neither Snowflake nor Segment provides direct integration for each other, this option offers a good alternative. You can integrate their server-side sources using modern programming languages such as Clojure, Go, Java, Node.js, PHP, Python, Ruby, .NET (pick your flavor of choice).
The wide range of language options means you can use any of the languages to develop a script that pulls data from Snowflake and sends it to the API. Since it's server-side, you can also run your script at a certain interval with cron scheduler.
This tracking API document explains how to interact with the API. To give you an idea, we will cover three of their APIs: identify, track, and batch.
API #1: Identify
The identify API is designed to record user creation. You can include a unique user identification and any optional traits you want to attach to it. Segment recommends calling the identify API once when a user’s account is created and only when their traits are changed. For example, you can call the API by sending a post request to the URL address below.
The track API allows you to track the actions users make such as user login, item purchased, order canceled, message left, and more. As above, you can call the API by sending a post request to the URL address below.
Within the properties section, you can name keys (ex. Instant Electric Pot) as you want.
API #3: Batch
Segment’s historical import using batch API can help you to load bulk data with one API call.
Among the API options, this may be more suitable for the data import from Snowflake into Segment. In this article, we explored indirect options because Snowflake is a data lake platform and we cannot pull data on an event basis. Instead, we can pull data in batches from the data lake and load them into Segment.
One key requirement for importing historical data is the timestamp argument. If you are using the API for real-time data (happening now), you can leave the timestamp empty and Segment’s servers will timestamp the requests.
Here's an example batch request endpoint:
POST https://api.segment.io/v1/batch
As you can see below, a request payload can contain multiple requests within the same body.
Since the batch API accepts multiple requests within the same body, it can be convenient to send multiple data in a single request.If you understand solution #2, you’ll see that solution #3 is similar. The key difference being solution #3 uses the Python Analytics library.
Solution #3: Python Analytics Library
Segment has an open-source Python library that sends requests to Segment’s servers to record your data. Although this section is written to introduce Python Analytics Library, you can find your preferred language in the Segment document. Using the library, you can write a server-side controller code or stand-alone script to run regularly. This analytics library utilizes an internal queue to speed up the identify and track of API calls. It also batches request messages and flushes asynchronously to Segment’s servers in a separate thread.
To install the library, run pip install:
pip install analytics-python
After install, in your code, provide your write key:
import analytics
analytics.write_key = 'YOUR_WRITE_KEY'
Note: If you need to send data to multiple Segment sources, you can initialize a new Client for each write_key.
To send an identify request, call the function as below:
analytics.track('3jf8dsfh','Article Downloaded', {
'title': 'Top 10 Books for Your Holiday','author': 'Alice Tone'
})
Lastly, you can also use the historical import function in the library as well. Just like the HTTP API, you need to provide a past timestamp unless you want to send live data.
Segment’s libraries are designed to ingest hundreds of requests per second. Every function you call does not lead to an HTTP request. Instead, it's queued in memory. The stacked messages are flushed in batches in the background, which enables efficient operation.
If you’ve made it this far, you’ve seen three separate solutions for syncing data from Snowflake to Segment. Each solution requires some expertise in terminal, API connections, Python, SQL, Amazon S3, and ETL pipelines. Additionally, they require periodic monitoring and updating to ensure accuracy and functionality. Our final solution is designed to help you not only sync data from Snowflake to Segment, but sync data from Snowflake to all the destination applications your organization uses on a daily basis. It's called reverse ETL.
Solution #4: Reverse ETL with Census
You can easily sync data from Snowflake to Census by following these steps.
Perform a sync from Snowflake to Segment. Information on the sync process will look like this once complete:
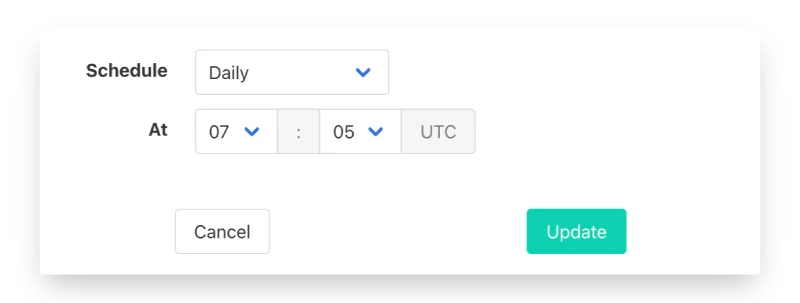
Census has a built-in feature for scheduling syncs. This helps ensure Segment always has the most up-to-date data. You can schedule as often as every hour, or as little as once a month.
Census also has video tutorials, easy-to-follow documentation, and customer support if you run into any issues during your free trial (and beyond).
Where to go from here?
You’ve examined four separate solutions for syncing data from Snowflake to Segment. If you're doing a one-off task or have expertise in the terminal, Python, SQL, Amazon S3, and ETL pipelines, you might consider solutions #1, #2, or #3. However, if you're looking for a long-term solution for you and your company, I recommend method #4, reverse ETL with Census.