Sync your data from Snowflake to NetSuite | Census
Parker RogersApril 15, 2022
Parker is a data community advocate at Census with a background in data analytics. He's interested in finding the best and most efficient ways to make use of data, and help other data folks in the community grow their careers. Salt Lake City, Utah, United States
Here’s the cold, hard truth: enterprise platforms cannot survive alone. With no way to interact with other systems or digital assets, data platforms become isolated, rendering them essentially useless.
Although this is true of all enterprise platforms, it’s especially true for data products. Data software needs the functionality and flexibility to import and export fresh data, generate more insightful metrics and allow more comprehensive data analyses, so your teams have the business intelligence they need to build efficient operations, modify workflows, or simply connect on a deeper level with customers. As luck would have it, pairing Snowflake with NetSuite provides just that.
Have you just started using NetSuite and you need to figure out how to shift data from your data warehouse into it? Or, do you want to keep your NetSuite customer data fresh and current with a regular sync? Maybe you need to keep your teams informed on “what’s what” with your product data and dashboards?
Regardless of your use case, we’ve got you covered. 😎
This article provides a guide to syncing data from Snowflake to NetSuite, including:
Manually exporting data from Snowflake - Unloading into a stage and downloading locally - Unloading into an external location - Downloading from Snowflake Worksheet
Manually importing data into NetSuite
A fully automated sync using Census reverse ETL
What is Snowflake?
First up, let’s chat about the platform from which you export data: Snowflake. Snowflake is a fully-managed software as a service (SaaS) that combines data warehousing, data lakes, and other data sources for the secure sharing and consumption of real-time/collaborative data in a single platform.
Although it was first launched to be run on AWS S3 in 2014, it has since expanded to be compatible with both Microsoft Azure and Google Cloud platforms. With pay-as-you-use pricing and cloud-based software and hardware structure that enables the storage and analysis of data, Snowflake has grown to be one of the largest data products in the industry. 🤯
What is NetSuite?
On the other hand, NetSuite is an all-in-one cloud business software suite that automates core business processes (finances, operations, and customer relations) and provides real-time visibility into the efficiency of these processes. With solutions for ERP, CRM, PSA, inventory/warehouse management, and e-commerce, NetSuite (now acquired by Oracle) has been a trailblazer in the cloud computing domain since its inception just before Salesforce in 1998.
How to export data from Snowflake
Here's the bad news: NetSuite does not offer any kind of native support to connect to Snowflake (or vice versa for that matter). So, unlike syncing data from Snowflake to Google Ads or from Snowflake to Segment, we will have to manually export data from Snowflake and then manually import that data to NetSuite.
Unloading into a stage and downloading locally
The first method for exporting data from Snowflake involves unloading data from a table into a Snowflake stage using the SQL “COPY” command, followed by downloading the data files into your local drive using the “GET” command.
Run the "COPY" command
To unload data into an internal location, we’d recommend using the “COPY” command following the syntax below.
Of course, it’s one thing to see the basic syntaxes, and another to actually put these to use. Check out these examples for some real-world applications!
Example 1: - Here, the “COPY” command example unloads all data from the budget table into the table’s stage using the folder/filename prefix (result/data_), a named file format (yourformat), and gzip compression.
copy into @%budget/result/data_
from budget file_format =(format_name ='yourformat' compression='GZIP');
Example 2: - In this case, the command unloads the result of a query into a named internal stage (your_stage) using a folder/filename prefix (result/data_), a named file format (yourformat), and gzip compression.
Although these two examples are functionally identical, the main difference is that the first one unloads data into the table’s stage while the second one unloads data into the internal stage. In case you have questions regarding the differences between a table stage and an internal stage, here’s some helpful Snowflake documentation that dives into the nitty-gritty.
Run the “GET” command
Once you’ve unloaded the data using the "COPY" command, Snowflake’s “GET” command lets you download the staged files with the following syntax.
GET internalStage file://<path_to_file>/<filename>[ PARALLEL =<integer>][ PATTERN ='<regex_pattern>'' ]
Conveniently, the {internalStage} section follows the same rules as the “COPY” command, so to run the “GET” command, these will need to match.
Depending on your Operating System, "file://<path_to_file>/<filename>" has different structure.
For Linux/Mac: include the initial forward slash in the path (e.g. file:///tmp/load).
For windows: include the drive and backslash in the path (e.g. file://C:\temp\load).
If you want to download the files from the table stage into a "/tmp/data" folder in Linux, it will look like this.
get @%budget file:///tmp/data/;
And just like that, you’ve exported data from Snowflake using a stage and downloaded it locally. 👏
Unloading into an external location
The second Snowflake-supported way to export data from Snowflake is by unloading it to an external location like AWS S3. However, before you can start using an external export, you need to configure your AWS credential in Snowflake to allow it to access your S3 bucket.
This can be done in one of two ways: either by using Snowflake’s storage integration or by providing AWS_KEY_ID and AWS_SECRET_KEY in a “COPY” command. Sound familiar? In this case, however, the “COPY” command follows the syntax below.
In the {externalLocation} definition statement, you’ll provide your storage integration name or a pair of AWS Key ID and Secret Key explicitly using the following syntax.
After you export the data, you can then download it from the S3 bucket into your preferred local location. There you have it, folks – that’s how you unload your Snowflake data into an external location!
Download from Snowflake Worksheet
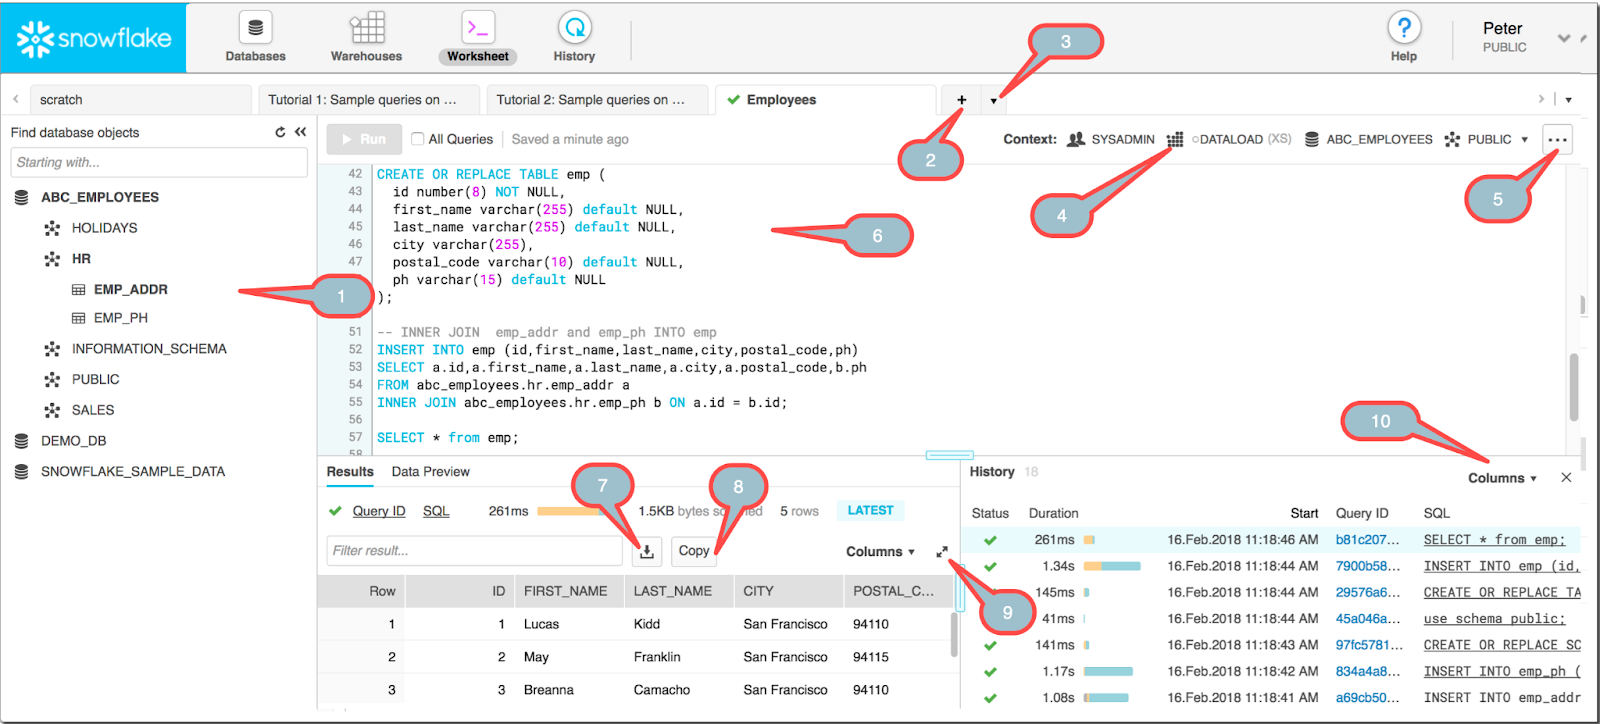
Finally, if you’re looking for your quickest, simplest option for exporting Snowflake data, look no further! For a fairly small dataset, downloading your data from a Snowflake Worksheet (where you run queries and see results on your web browser) can definitely save you time.
Snowflake Worksheet
Among the console options above, balloon 7 is what you’re looking for. After executing your query, clicking the download icon shown lets you save the result to your local storage.
How to import data into NetSuite
Since we have our data ready, we can import the data into NetSuite. Conveniently, NetSuite data imports provide an Import Assistant that you can use to import CSV files. Whew! 😌
To start using the Import Assistant, you have two options:
For single-use data mapping: - Go to Setup > Import/Export > Import CSV Files
To create saved data mapping templates for reuse: - Go to Setup > Import/Export > Saved CSV Imports
The types of data that you can import with the Assistant can be decided by your account’s enabled features, in conjunction with your assigned role and permissions. To find out more about roles and permissions, check out this handy NetSuite documentation.
As you navigate the Import Assistant, you will be prompted to scan and upload a CSV file, confirm your import options, conduct file and field mapping, and save your mapping before starting your import.
Import assistant
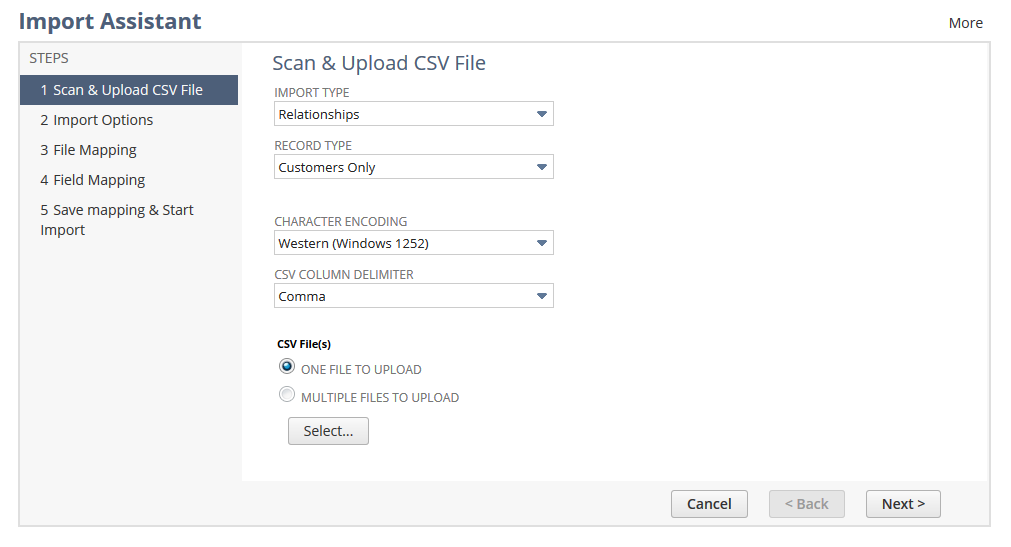
Scan & upload CSV file
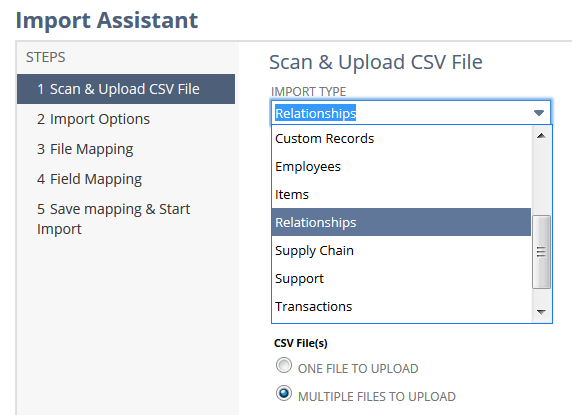
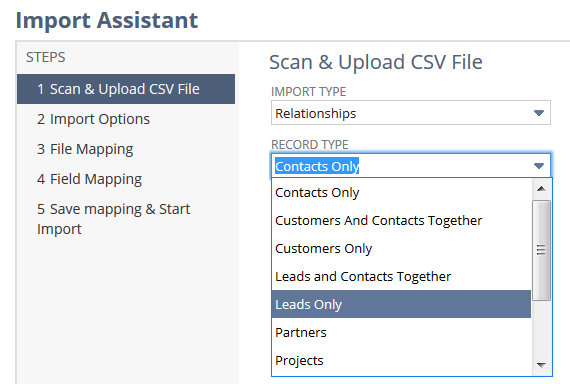
First, you need to choose one of the import types as shown below. Note that the import type you choose is dependent on the data you are uploading and will affect the record type you're able to select down the line.
Import type
You can then choose a record type from the listed options.
Record type
After the record type option, you have the option of choosing an encoding type and a delimiter. Our advice? Never change the encoding type or the CSV Column Delimiter – always keep it as the default. Trust us, this will prevent you from running into issues down the road!
Then, you can select a data file (of 25,000 records or less), but make sure it’s a CSV. You'd be surprised by how many people select a different file type and can't figure out why their import fails.
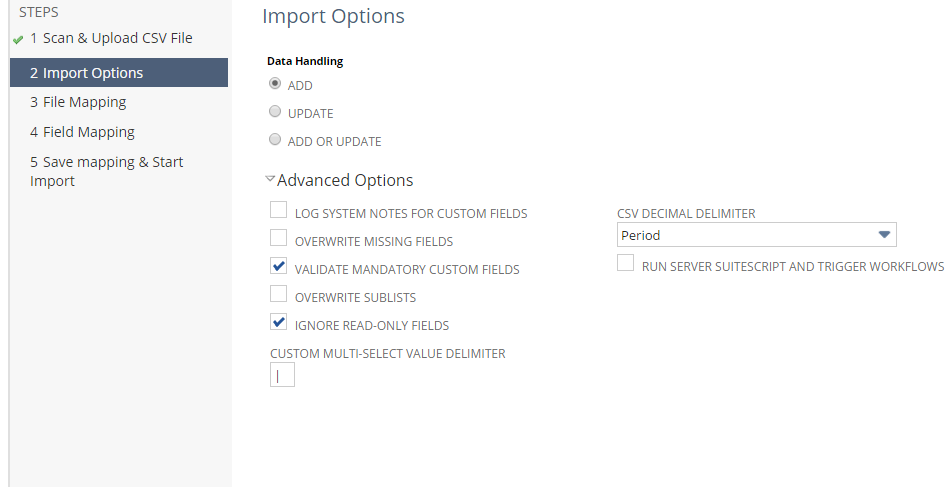
Import options
After uploading a CSV, you’ll move on to the Import Options section, where you can define data handling, advanced options, and CSV decimal delimiters.
Import options
You can choose one of the following options for data handling.
Add — your dataset will be added to NetSuite.
Update — if the data in your dataset already exists, the existing records will be replaced with the new ones.
Add or Update — It’s generally considered best practice to always select this option, regardless of if your data contains both new and existing records.
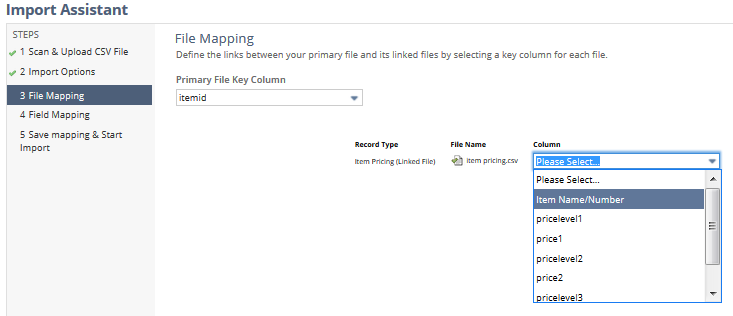
File mapping
File mapping is pretty straightforward: simply select a primary key to be used to link between this file and other linked files.
File mapping
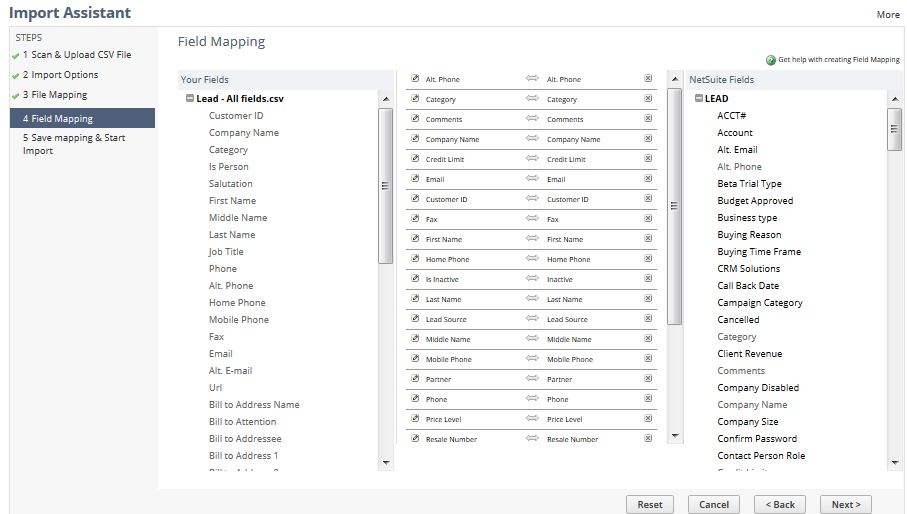
Field mapping
Field mapping allows you to map the fields of the files you are importing with those already in NetSuite, but you can also hardcode these values. For example, if you select the pencil icon next to the "category" field, you could select a value in the system that would set “category” to a specific value for every instance.
Similarly, you can also change a field to be mapped by its name, external ID, or internal ID. Regardless of the option you choose, you can set any or all of these by selecting the pencil icon next to the field name.
Field mapping
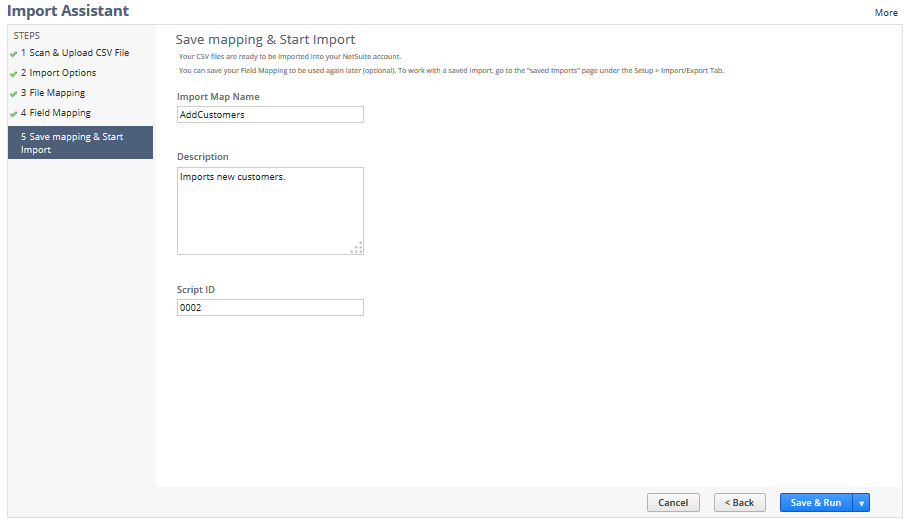
Save mapping & start importing
Finally, the last step! Save your mapping configurations and start importing your data files. 🎉
In the Import Assistant, you can save your import settings to reuse them (and simplify your data import) in the future. You can review mappings for your previously completed import jobs on the Saved CSV Imports page.
💡
Running into some import issues? Check out these tips and tricks to help you troubleshoot:
🎯 Scrub your data to make sure the format has been transformed to work with NetSuite.
For instance, if the data is a "list" field (or any field that has set values in NetSuite for that matter), the data has to match that value "name" exactly. If there is any difference between the two or if there are ghost spaces (spaces before or after the value in the CSV file that you can't see), your import won't work
🎯 Make sure all numerical info is consistent with the numerical format set in NetSuite’s general preferences.
🎯 Make sure each record has an external ID.
Records that have multiple line items (like a purchase order) will be represented as one PO with multiple line items that share the same external ID as the header.
Automate your data sync using Census reverse ETL
We know, that was A LOT. Fortunately, Census has created a way to simplify this process of syncing data from Snowflake to Netsuite. Hurray for improved data pipelines! Census has detailed and easy-to-follow documentation as well as a hands-on demo video. Without further adieu, here’s the video:
First, we'll detail each step, starting with NetSuite. Pay close attention to the individual steps, and the “builders beware” sections so you don’t waste any time.
NetSuite
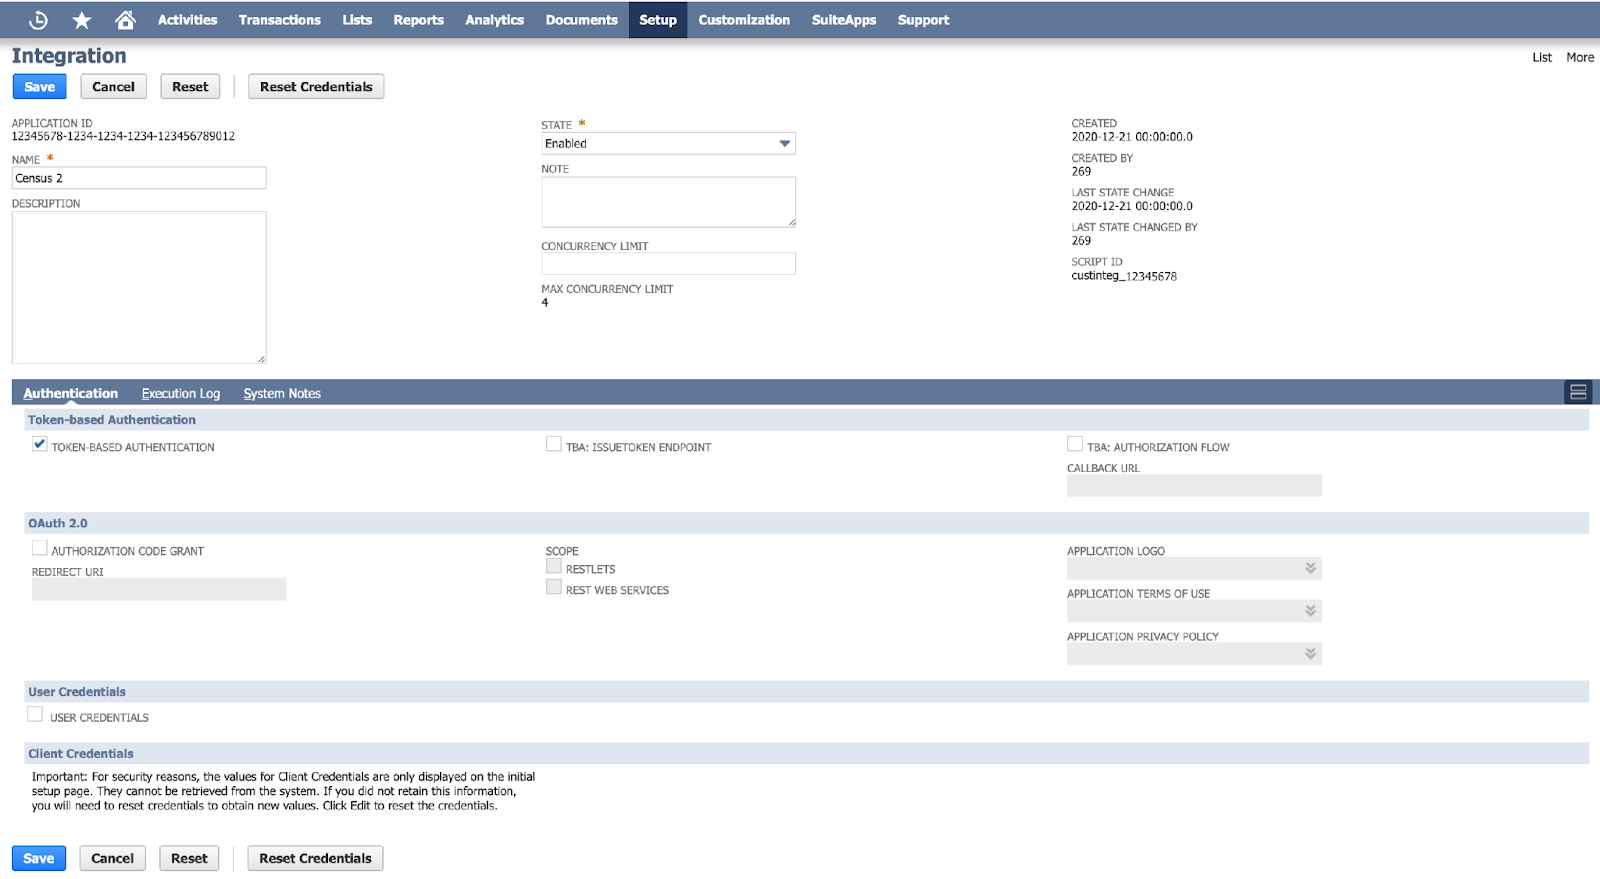
Start by creating an integration record for Census with the following steps:
Visit the integrations page or use the global search to look for and navigate to the Manage Integrations page
Create a new integration with the following specifications:
Click Save to finish
Next, you'll need to enable token-based authentication:
Use the global search to look for and navigate to the Manage Integrations page
Navigate to the tab SuiteCloud > Manage Authentication
Make sure Token Based Authentication is checked
Click Save to finish
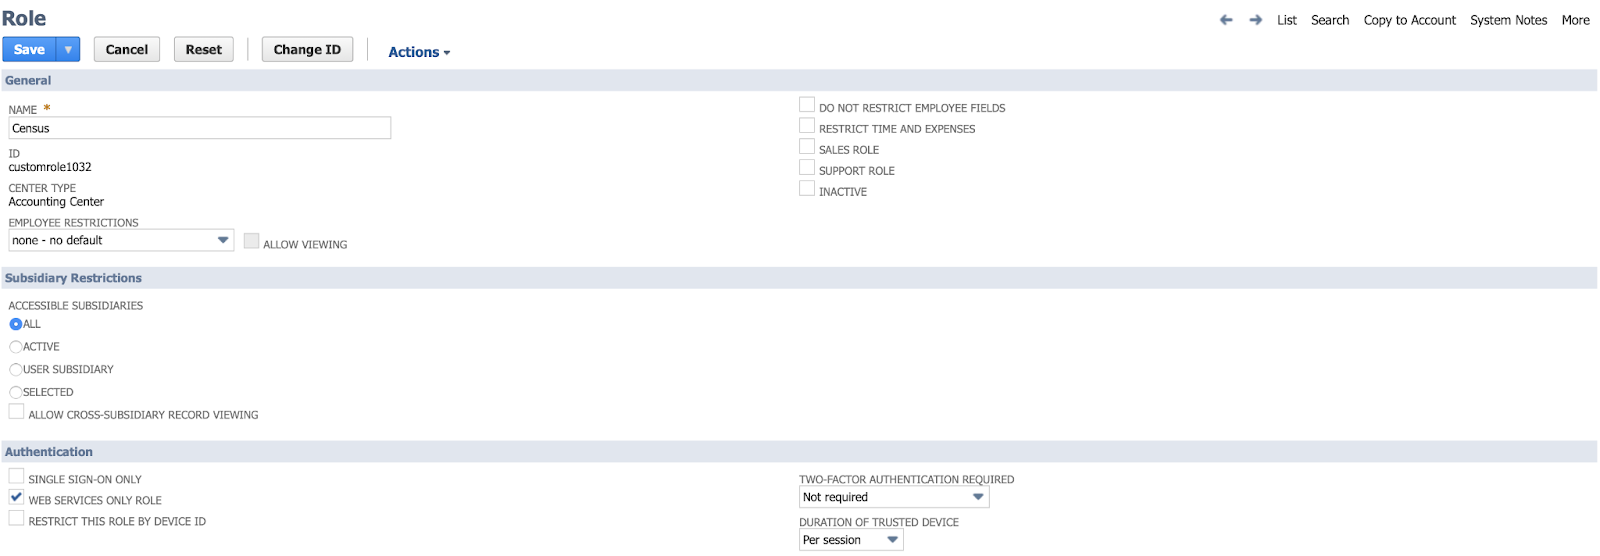
Now, create a Token Role:
Use the global search to look for and navigate to the Manage Integrations page
Name the role (Census) and follow these specifications within the role:
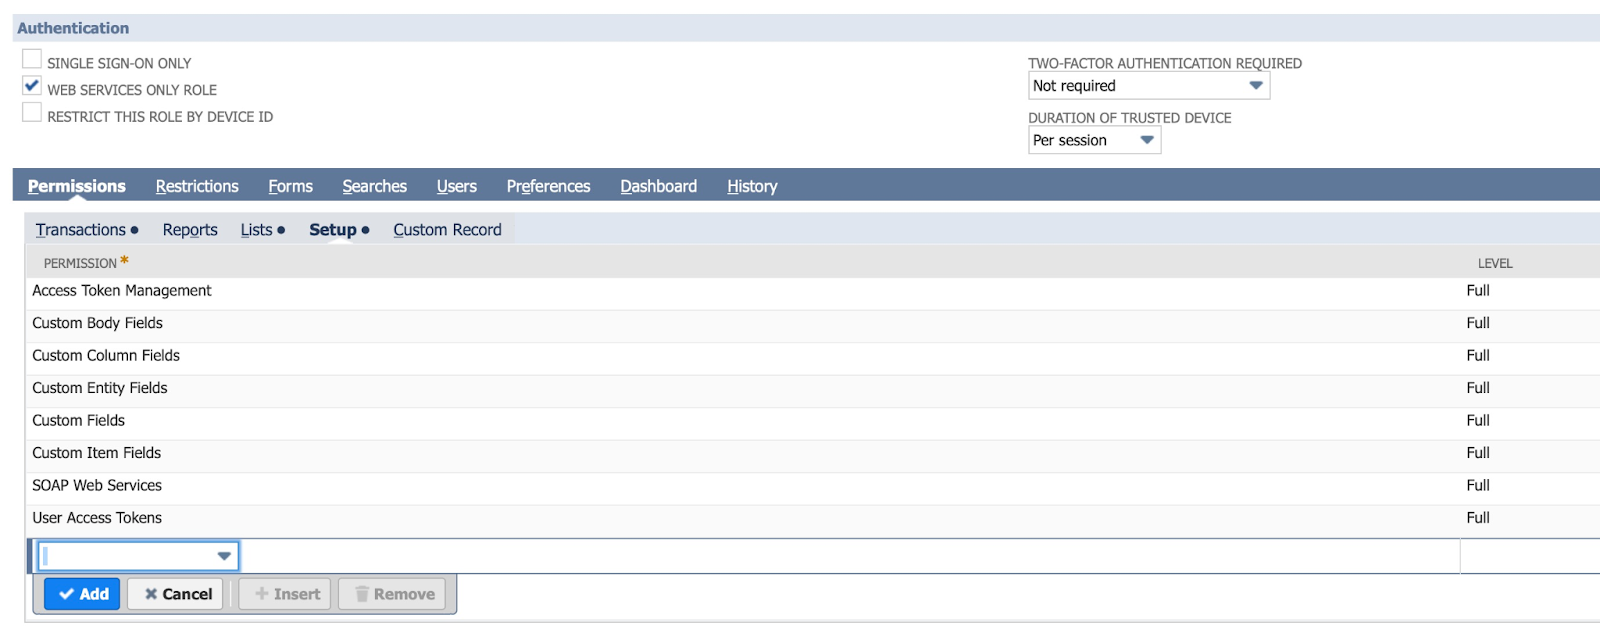
Under Permissions > Lists, give your role the appropriate permissions for the NetSuite objects you'll be updating. For example, to update 'Customers', you'll want to give this role the Lists > Customers (full) permission
📣
Builders beware! If you mess up on this step, you’ll have to recreate a new role. Follow the steps closely and double-check them.
You're halfway there! Go ahead and add your Token Management Permissions.
Run a global search to the Employees page
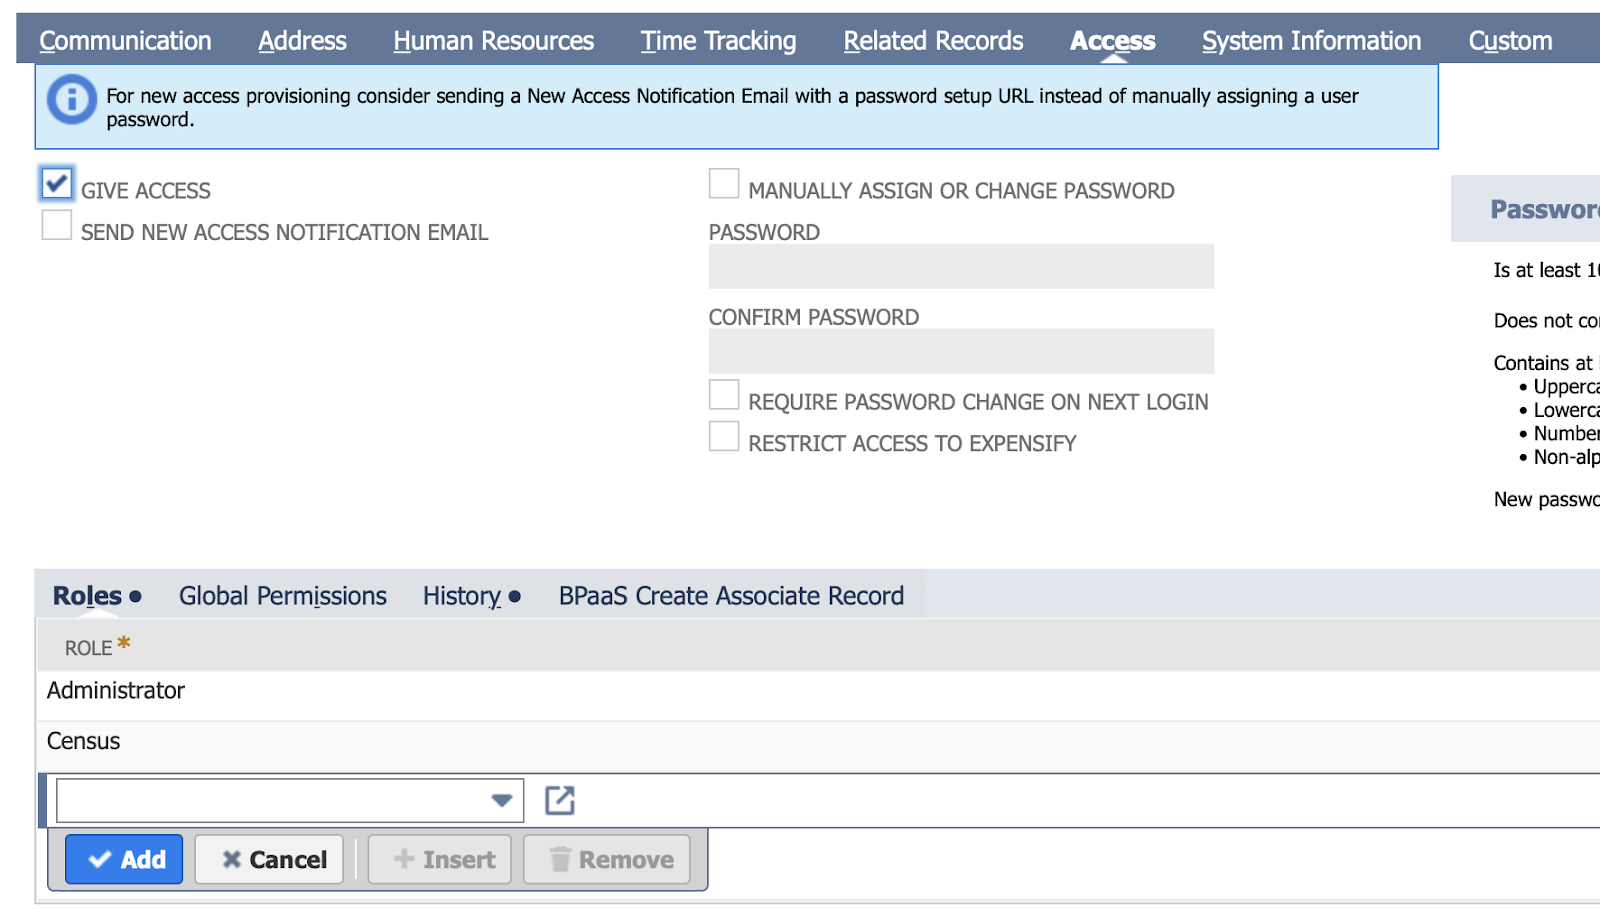
Edit the employee record of the Admin user you will be using Census with
Navigate to Access > Roles and add the Token Role you just created above
Next, create your Access Tokens.
Run a global search to the Access Tokens page
Click New Access Token
Select the application and role we created above, then press Save
Copy and paste the new Token ID and Token Secret to your password manager or file (you'll be needing it again!)
📣
Builders beware! NetSuite updates do not occur immediately. Updates can take up to anywhere from a few minutes to 24 hrs. If you run into any issues later, this could be the "why" you're looking for.
One last step on theNetSuite side of things: create a NetSuiteAccount ID.
Run a global search to the Company Information page
Your ACCOUNT ID will be found on that page. Copy and paste it with your Token ID and Token Secret.
And that concludes the NetSuite setup! 💃
Next, you'll set up your sync on Census. Census offers a free trial, so you can complete the sync without having to pull out your credit card!
Census
Before you begin, there's just one, small prerequisite: you'll need to sign up for a free Census account.
First, you'll connect Snowflake and Netsuite with these simple steps:
From the Quick Start page, click Add Source, search for Snowflake, add your required credentials, and click Connect
Navigate back to the Quick Start page, click Add Destination, and search for NetSuite. Add the NetSuite credentials you saved from the previous section and click Connect
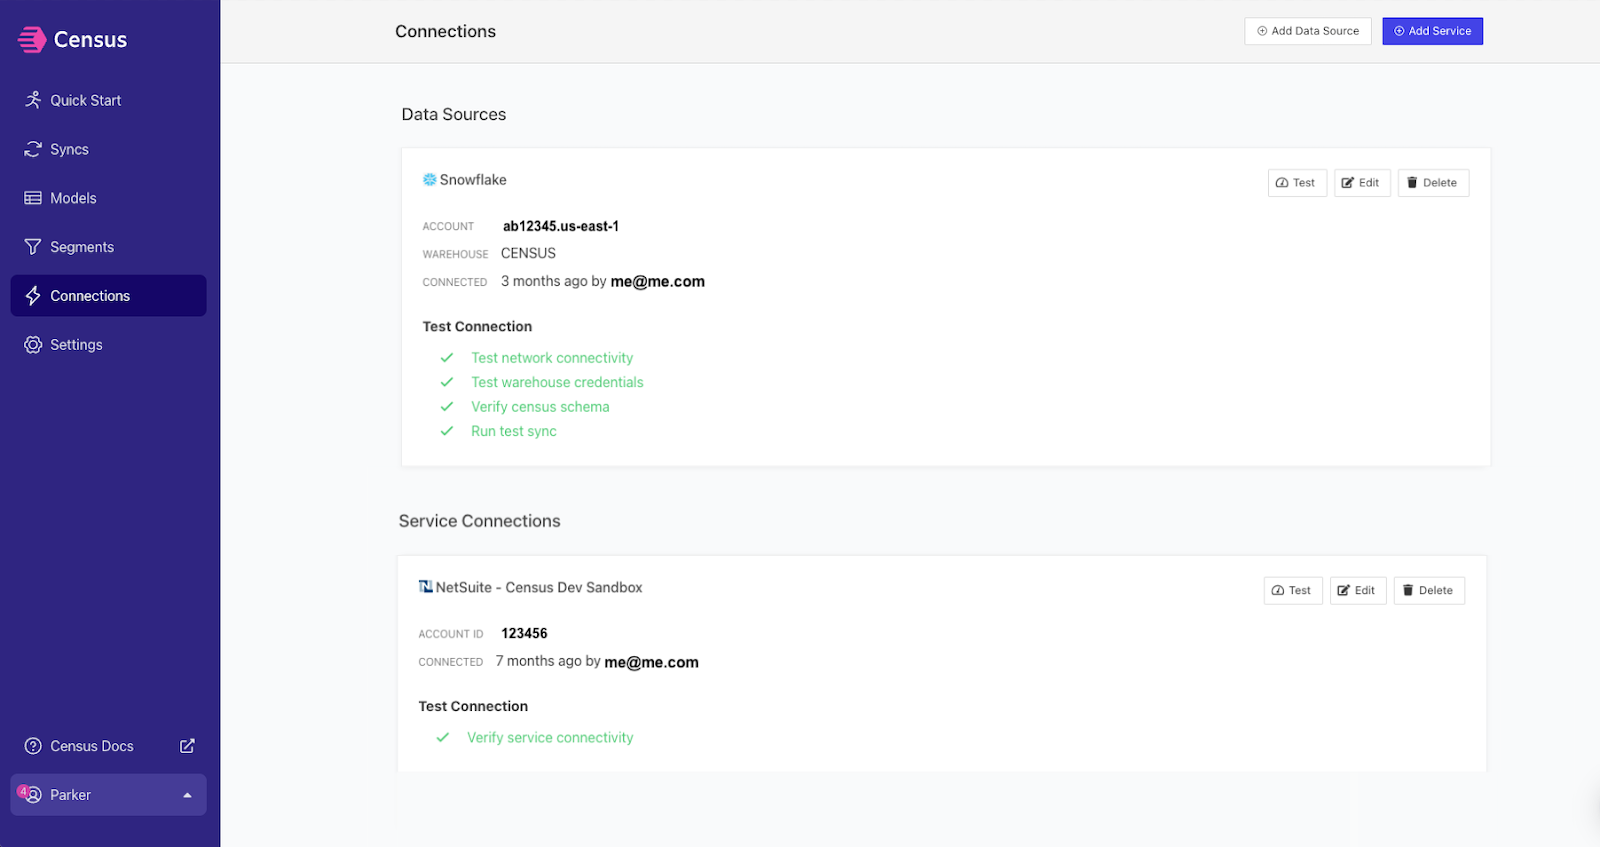
Test both your Snowflake and Netsuite connections by Clicking Connections > Test
Next, you'll build a model using your preferred method (either SQL, dbt, or Looker).
From the navigation bar, click Models> Create a model.
Give your model a name (like “NetSuite Customers” if you’re syncing to the customer entity). If you’d like to preview your query, click Preview. Otherwise, simply click Save Model.
Finally, create a sync.
Navigate back to the Quick Start page, select your newly created data source, Snowflake,and your newly created destination, NetSuite. Click Create Sync.
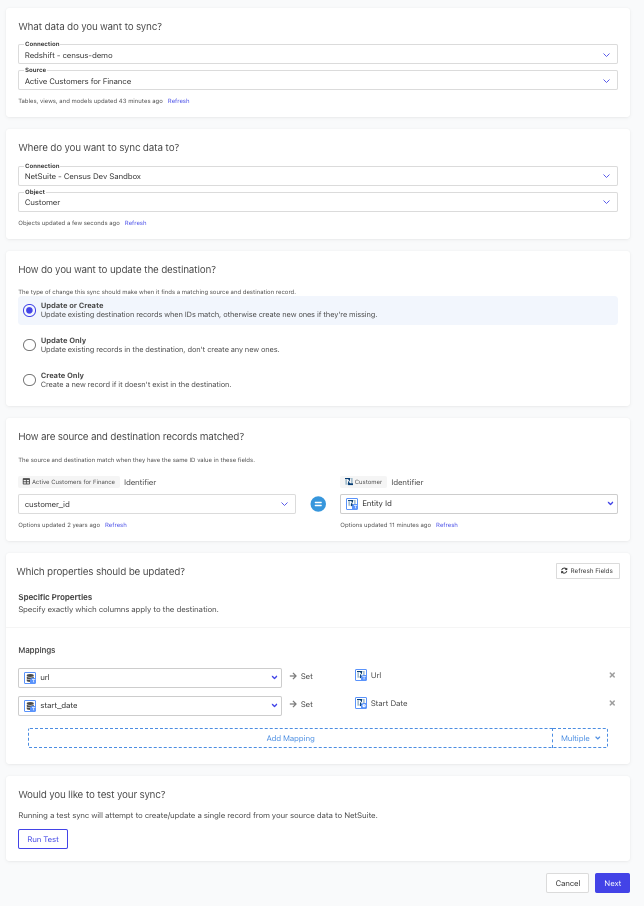
Select your newly created model from the Source dropdown, and choose from one of the several Netsuite destination objects (ex. Customer, Employee, etc.)
Choose how you want the Netsuite destination records matched (ex. Customer ID, email, etc.)
Choose how you want the Netsuite destination records matched (ex. Entity ID, external, etc.)
Choose which properties (columns) should be updated on Netsuite (ex. Domain, Account Name, email)
Click Next, check Run Sync Now, and Create Sync.
Woot woot, that's it – you're all set! 🙌
Wrapping up
This article guided you through the manual steps of exporting data from Snowflake and importing it into NetSuite as well as the Census reverse ETL method. Although NetSuite does not support native Snowflake connectivity, you can scoot around this using the non-native methods discussed to sync data between the two platforms.
Now you’re a pro, right? 😎
Want to learn more about syncing data between different platforms? Check out our list of “how-to” guides here.