How to Connect Databricks to Salesforce with a CSV Export or Data Tool | Census
Parker RogersMarch 04, 2022
Parker is a data community advocate at Census with a background in data analytics. He's interested in finding the best and most efficient ways to make use of data, and help other data folks in the community grow their careers. Salt Lake City, Utah, United States
Within a company's data infrastructure, it’s not unusual to have several disparate sources of data from product, marketing, sales, etc. Many companies manage a central repository like Databricks (👋 reader) which unifies all the data sources into one.
Getting data into a Databricks is a fairly straightforward task - there’s tutorials all over the internet at your disposal. The trickier, and less publicized, task is to move data out of Databricks and into operational tools like Salesforce. This blog covers four separate step-by-step methods for syncing data from Databricks to Salesforce. Once you’ve successfully connected the two, you can deliver incredible value to your organization, including:
Providing sales teams rich first-party data to help them close new business.
Helping marketing teams create high-quality, customized email drip campaigns.
Supplying product teams valuable data to understand and improve the customer
Take a look at each method and pick one that suits your expertise and company's needs best. Let’s get started!
How to sync data from Databricks to Salesforce
Currently, Salesforce and Databricks do not provide a native sync integration. To sync data, we’ll have to use alternative solutions. This essentially requires us to export data from Databricks and load it into Salesforce using the methods that each platform supports. We’ll first tackle a few ways to export data from Databricks.
Export option #1: Use Dataframe in Notebook to export CSV
Within a Databricks Notebook, you can directly interact with various data sources big and small. When you read data, you can load it as a data frame, transform it as you want, and then export the data frame to CSV or another file format. When you export, you can write one or multiple CSV files in the Databricks file storage. Once you finish generating the file, you can go to the target storage and download the CSV file to your local computer.
The example code below demonstrates how to export data into databricks file system (dbfs) using df_export:
Within the code, check the coalesce with the value, 1. This option defines the number of partitions (files) you want to write into the target storage. In this example, your dataframe will be stored as a single file. The option() section with “header” allows you to export with column names. There are more options you can utilize as below:
.option(“delimiter”, “YOUR_DELIMITER”): you can define a delimiter. This is useful when some of your columns include a comma in its data, which will break the CSV format. When that happens, try to find a character like “|” that doesn’t appear in your data and put that in your option.
.option(“compression”, “gzip”): your CSV file(s) can be compressed into gzip, which will save your storage.
.option("nullValue", “REPLACE_TO"): you can replace null values with the value you define.
.option("escape", "ESCAPE_CHAR"): you can add a character for quotes in data.
.option("encoding", "ENCODING"): by default, it is utf-8. You can specify an encoding.
To add multiple options, you can keep adding the clause:
Next, let’s look at another method for exporting data using Databricks’s CLI.
Export option #2: Use Databricks CLI to export CSV
Databricks provides a CLI (command-line interface) to interact with your Databricks cluster. Using the tool, you can access your dbfs and save to an export location of your choosing. When you have CSV data in the dbfs file system, you can use the cp command to copy the selected file into your local storage. To use Databricks CLI, check the documentation to prepare your environment.
The first step is to call Databricks file system command:
databricks fs
Next, use the cp command to copy the file. You can also use options for additional configuration:
This command copies the extracted file in that dbfs folder and pastes it under your current location. If you want to do this recursively for an entire folder, you can add the -r option.
databricks fs cp -r dbfs:/myfolder .
Note: The dot “ .” in the end, means the current local folder.
Now let’s look at a third method for exporting data from Databricks.
Export option #3: Use table dump via JSpark
You can use JSpark with JDBC to export table data into your local disk in CSV. Before using this method, you need to configure your JSpark environment. When you query the data you want to export, each method supports different syntax as you could see from the DataFrame and CLI examples above. One straightforward way to query data for data engineers is to run a SQL command.
Let’s assume that the table has the following schema:
id: integer
name: string
dmp_start_date: string
department: string
You can use the following JSpark command with an SQL command to query the table and export the result:
java -Dconfig.file=mycluster.conf -jar jspark.jar -q "SELECT id, name, emp_start_date, department FROM employee"-f csv -o export.csv
A couple things to note here:
-q: SQL query string is supported.
-f: JSON, XML, CSV, HTML or simple is supported.
-o: output string, stdout, or file name is supported.
Note: This method is less flexible compared to the Databricks CLI since it only allows you to export data into your local computer.
If none of the methods above sound interesting to you (or like more hassle than they’re worth every single time you need to move this data), don’t worry. We have another method toward the bottom that seamlessly syncs Databricks and Salesforce as if it were a first-party integration. Before we dive into that method, though, let’s take a look at how to import data into Salesforce.
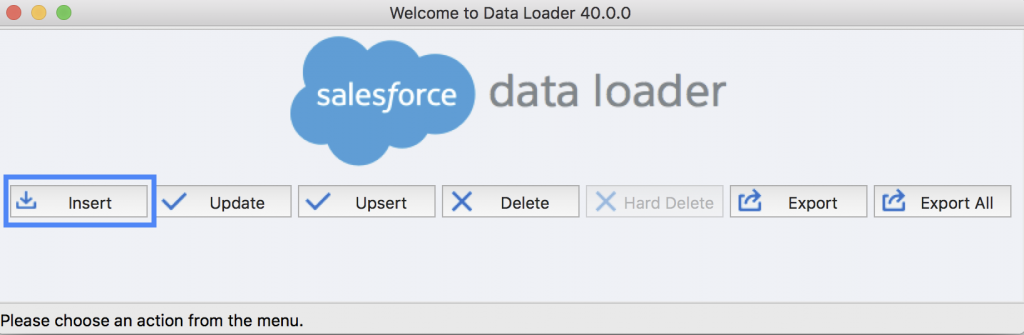
Import option #1: Use Salesforce Data Loader
Now that you’ve successfully exported a CSV from Databricks, we’ll go over two options for importing the CSV into Salesforce. Similar to the methods above, pick the method that suits your expertise and company needs best.
First up is Data Loader, a 3rd party web-based application for importing and exporting data into Salesforce. Data Loader can support 50,000 to 5 million records at a time, and you can schedule the loader to retrieve fresh data regularly. Follow these steps to successfully load your Databricks export into salesforce:
Install Data Loader (if you haven’t already) on your macOS or Windows. When you execute the installer file, you can select and download Data Loader and its installer.command file.
Configure Data Loader by deciding batch size, null value handling, host address, login credentials, compression type, timeout, query request size, encoding, and more. These settings will differ depending on your environment.
Batch Mode: you can run a series of data loading tasks using the Windows command-line tool.
Data Loader CLI: you can perform more flexible tasks using the CLI tool. You can insert, update, or delete records. You can programmatically map fields between the source and target data and use CSV data sources to import into Salesforce.
Import option #2: Use Salesforce Data Wizard
Data Import Wizard is Salesforce’s native feature that allows users to easily upload data. Using this feature, you can import up to 50,000 records at a time (significantly less records than Data Loader). To load your CSV file, follow the steps below.
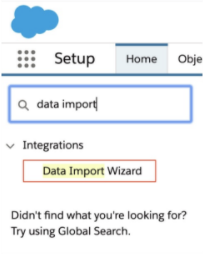
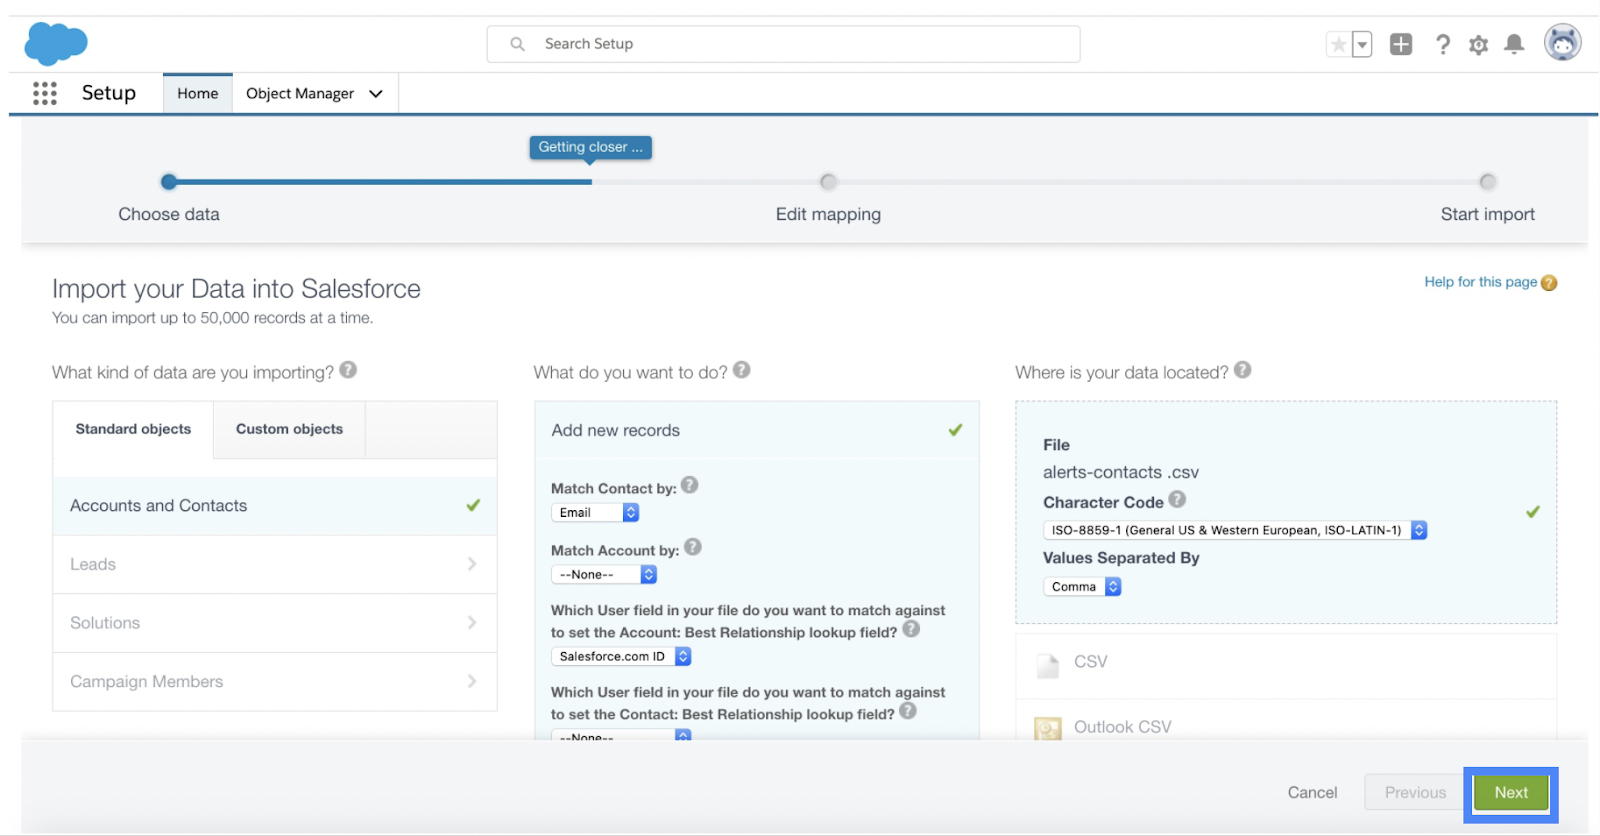
Go to Setup in Salesforce and type Data Import Wizard in the Quick Find bar as below. Then, select Data Import Wizard.
2. Check the prompt information and click Launch Wizard.
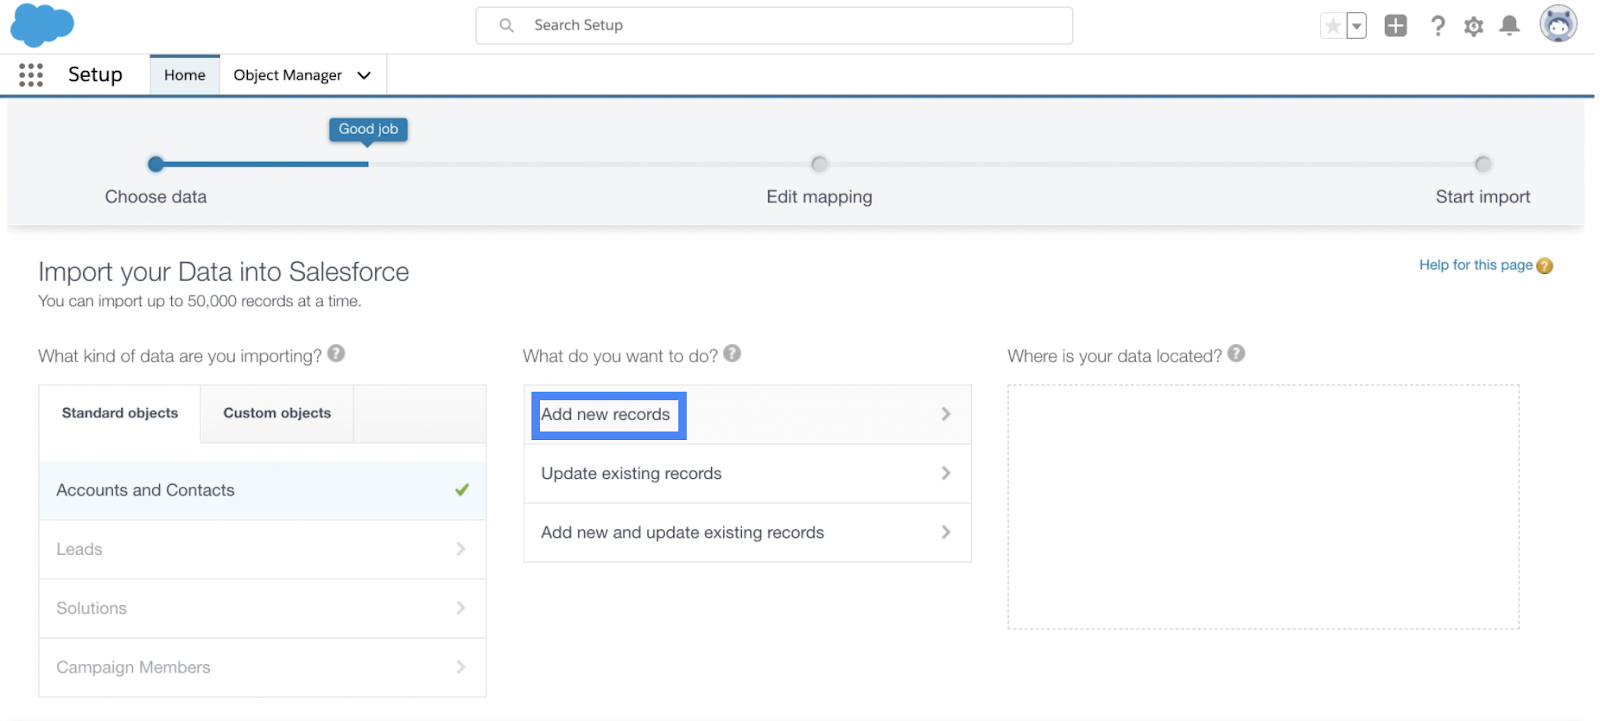
3. You can either select:
Standard Objects to import accounts, contacts, leads, solutions, person accounts, or articles.
Custom Objects to import custom data.
4. Decide the type of import - add new records, update existing records, or add and update.
5. The rest of the fields depend on your use case. You will also be prompted to upload your CSV file.
6. For the encoding field, leave it as it is unless you used a specific encoding.
7. Select a comma or tab for the value separator.
8. Click next.
9. Map the fields between your source CSV data and target data.
10. Review and start your import.
11. Finally, check your import status.
A final (and easier, faster) option for syncing data from Databricks to Salesforce: Reverse ETL
Since Databricks and Salesforce don’t have a native integration, you can use any combination of the methods above to run a successful syc.
However, each of these methods has it’s limitations, not the least of which is the time each takes to do every time you need to export a CSV and load it into Salesforce. There’s a better way, and that better way is reverse ETL.
Not only can you sync data from Databricks to Salesforce with ease, but you can send data from Databricks to any application used in your organization. Our reverse ETL tool syncs data from data sources (Databricks, Snowflake, and countless others) to a frontline system of action (Salesforce, Hubspot, Marketo, and dozens more). It has built-in, flexible integrations for Salesforce and Salesforce Marketing Cloud, allowing you to sync to various destination objects and fields. Additionally, you communicate with Databricks by writing SQL, allowing you to skip the CSV exports detailed earlier in this blog.
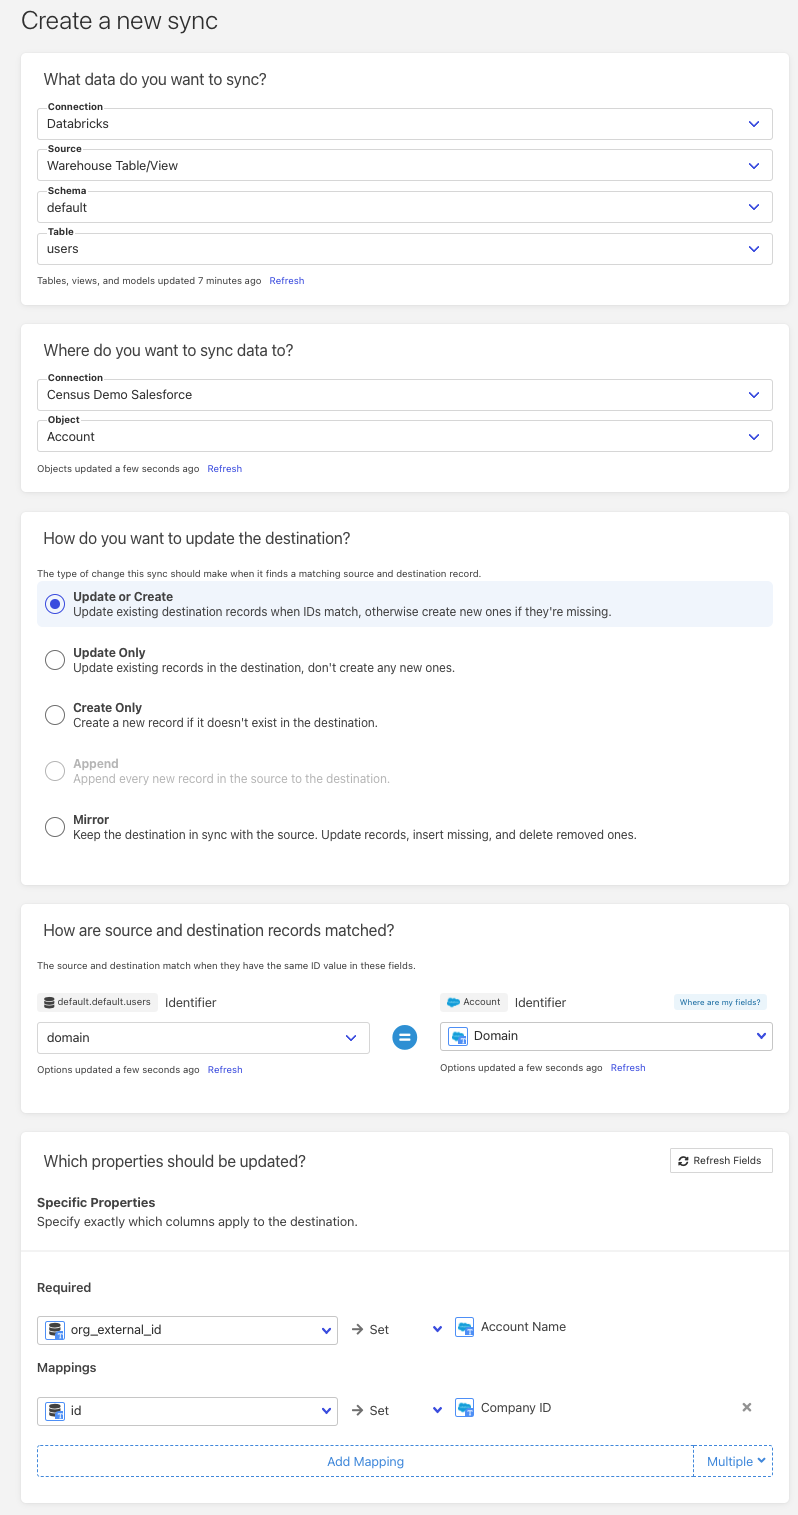
Here are the steps for using reverse ETL with Census to sync data from Databricks to Salesforce. If you prefer video tutorials, you can find them here.
Perform a sync from Databricks to Salesforce. Once completed, the page will look something like this:
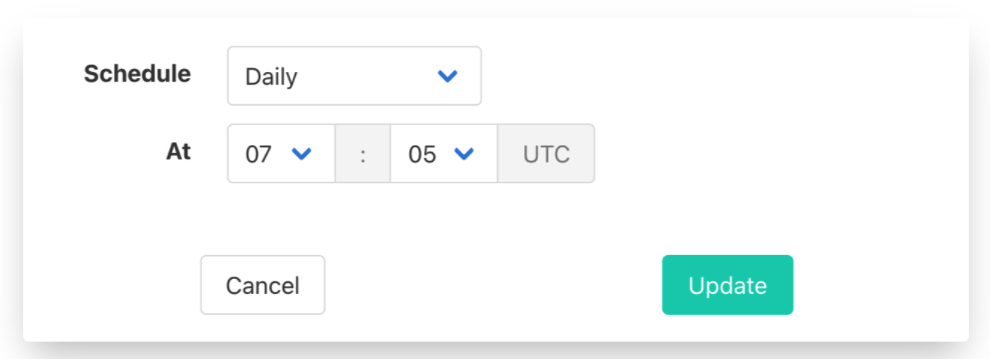
Additionally, you can use Census’ built-in feature to schedule syncs. This ensures Salesforce always has the most up-to-date data. You can schedule hourly, daily, monthly, etc.
Census also has video tutorials, easy-to-follow documentation, and dedicated customer support to help you if you run into any issues during your free trial (and beyond).
As I said up top, you should choose the method that makes the most sense for your use case. If you’re only making this sync one time and doing so for a small amount of records, one of the manual methods may be fine. However, if you want to spend less time manually moving data from A to B and more time doing interesting data work, you should check out Census.